Sunday, July 27, 2008

Water...Color -- Wks 55-56, July 13-26, 2008

Have you ever heard of monsoon rains? That's what they call the rainy season (July - September) down here, the Monsoon. It means that you get most of your annual rainfall in a very short period. Fast heavy rain like that is what causes flash flooding, washes to be impassable for a few minutes, hours or days and the desert to turn very green.

New Friends

The water can also bring some desert dwellers up out of the ground, like this lizard who shares our land with us.

We thought we only had one saguaro on our lot. It's about 7 feet tall and down close the road. But when Don & Patsy came out recently, they pointed out that we have another, baby saguaro. Be sure this little guy, and the 3 I bought from Desert Survivors recently, will be nurtured as long as we live there. The Sonoran Desert of AZ and Sonora, Mexico are the only places in the world where they grow, so they are protected here.

The baby saguaro is the one on the right. That's a baby barrel on the left.


Rainwater

As you might imagine, water is the most precious commodity in any desert. We've always intended to install a rainwater harvesting system with holding tanks as well as to landscape the land in such a way that the rain, when it does come, is routed to our plants.

Whenever you build on any piece of property, you change how the water hits the land and you affect the land of others around you. The rain that hits a roof runs off in a rush as opposed to just hitting the ground and mostly soaking in.

This is the drainage pattern from our roof. We plan to put tanks to the north (right) next to the shop. We plan to fill them from the tall side of the shop, and via underground piping from the short side and the garage which drains off the garage in a real torrent. We plan to use the rest of the water that drains from the house in a more passive way directed to planting areas.


I don't know if you will really be able to tell from these pictures, but they are intended to illustrate how the water flows from and around the house. This is taken from the shop deck looking down into the courtyard. Part of the water here comes from the porch roof and part from a scupper on the master bath.


All the water here comes from the porch roof which drains most of the house.

Not all the water we got around us in the last couple of big rains came from our house. This shows some of the erosion over the utility trench. About the 1st 20 feet here is our land and the rest is that of our neighbor to the north.

This bank is to the east. This water is coming from the house that's being built east of us. The owner/builder was over this week discussing how we can prevent it from making a lake in our parking area. We appreciate his concern and will work with him on that, but we feel that the water that hits our property, however it gets there, is our responsibility to manage.

This is how the front yard/parking area looked about 12 hours after the last big rain. This is much better than it was after the 1st big rain. Then it was a lake about a foot deep.

We obviously still had lots of puddles. This one is in the shop turning area.

But our builder had some minor grading done between the rains and it really helped. This is the water path around the south side of the house.

And this is the water path around the north side. Before we and the guy to the east started building, this neighbor to the north got a nice flow down this side of his house. He created a little diversion to bring it into his backyard through his fence wall. When we finish our plan, we hope we can make sure he gets the water he wants without getting more than he wants.


Rusty Doors

One of the things we've loved down here is that many people have garage doors that look rusted. That was something we wanted, but initially the only way to get them was to have a company apply steel panels to regular doors. Needless to say, that increased the weight, requiring bigger door opener motors and was not a good solution for the shop doors.

At a home show last year, we discovered that a company found a way to use a paint that would rust, providing the same look without the weight. Oh, and by the way, at 1/2 the cost. So we chose to do that. The garage and shop doors were installed the past week and they look great.

These are the panels on the truck.

Here are the guys carrying one of them into the shop.


Here they are installing the lift.


And this is what it looks like. You will see more pictures of these doors later.


Kitchen Cooking Area Tile

The progress of the kitchen cooking area tile continues. Our builder had some other issues to deal with besides installing it, so it may not look like much progress has been made here. However, it is about all done except for the grouting.

These are close ups of the corners, with lots of glare on them. We got special tiles for the exterior corners, but the interior ones had to be cut.


This is the whole thing from a different angle.


What will the neighbors think?!

Do you think we care about that? The painting is progressing and it looks pretty much like we thought it would. The colors change depending on the light and we expect them to fade over time, but we are starting out bold.

You may remember that it all started with 2 wants: Trout wanted a pink/orange/red shop and I wanted a blue house.

But I also love the green of the palo verde trees, especially their trunks. So I debated with myself about that and decided to use that green as an accent. The blue that we decided to use is called Lapis. It has a little yellow/green in it. It's different from the dark blue inside the house which is on the purple side.

That turquoise you see in the upper right of this picture is not a different color. It is not the tinted primer. It's the same color as the wall under the porch roof. It's just showing up differently in the sun in this picture. After all the painting is done, the floor guys will come back and stain the porch floor the same as the inside floor -- close to the color of the posts and the garage doors.

This shows the whole front porch.

This is the back porch from the southwest side of the house. Those clouds look threatening, but it didn't rain while we were there yesterday.

This is also from the southwest side, but it shows the south side of the house a little better.

Here's the shop. The rainwater harvesting cisterns will go along this north wall. You can see the scuppers toward the roof.

This is a good example of the same color looking different in different locations.
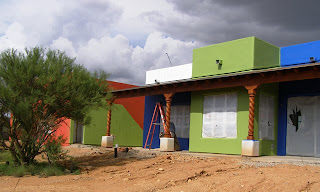

Here's the west side of the house from about where we will build our ramada. This is really showing the look we wanted -- like it was different buildings next to each other. I love the contrast of the green stairwell wall with the red shop wall.

And here's what we see now when we drive up. I'm always amazed when things turn out the way I expected them to turn out.

Sunday, July 13, 2008

More Tile & Septic -- Wk 54, July 6 - 12, 2008

I debated about doing a posting this week since seemingly so little happened, but I'm trying a different method of loading in the pictures suggested by our oldest daughter, Katie, aka Wonder Blogger, so I hope it works.

This week was devoted to tile and septic work and some exterior painting prep.

Before I really get started, I just wanted to show you this photo of my vanity countertop. I simply love it.

Non-sequiter: Trout and I felt there was too little green in the house, so we're going to have the back hall painted the green of the paint ball splotch on the right.

Now this will be the real test of my ability to follow Katie's suggestions. This plan shows where what colors are going to go on the exterior of the house. You should be able to click on it to make it big enough to see. It's been raining so much here this Monsoon season that our painters can't finish the job before ours or start ours yet.We were very excited to see the tiling started on the backsplash behind the cooktop. Dave had to mount the rangehood to get things right. There will be a 2" blue border (like so many other places in the house) along the top of this tile. You can see the electrical outlets above for the pendants. The bottoms of the lights will probably come down to level of the bottom of the rangehood or to the top of it where it goes into the vent. They should be about centered on the 2nd step of the design.


The guest bath tile got its initial grouting done. There may be some touch up required. See if you can find the mistake. There will be lots of little things like this in the house for the kids and grandkids and the generally curious.
Now here's my vanity with the sink in place but not grouted yet. That back wall will be a terra cotta color. And this is the master tub with initial grouting done. See if you can click on this picture and see the stars on the pony wall.The border in the master shower was finished this week, but not yet grouted. This is the back corner. And this is the shower head wall. The controls will be on the valve and the head will be on a sliding rail right in the corner. The septic got covered up this week. This is a view of most of the system from the shop deck. This is the area to the west of the tanks where we will eventually put a ramada. After the septic was finished, this little area was emphasized. We hope to create a small, uncovered sitting area here. It's a nice sized outdoor space that feels secluded and protected but provides a great view of the mountains.

Saturday, July 5, 2008

More Refinement -- Wks 52 -53, June 22 - July 5, 2008

There are lots of cabinets and there is lots of tile work to do, so the past two weeks have been primarily devoted to that.


Septic System

However, we can't talk about real refinement without showing the septic system. For those of you who have one, if you didn't see it put it from the beginning, you probably have little idea of how it works or what it looks like.

Ours in WA was built when the house was built (1927) and was tiny -- 600 gallons. The drain field had only one line originally. Of course it failed just before we sold the place, and we had to have it replaced, but the tank was grandfathered in due to the house's age.

Most newly installed septic systems in western WA require a mound system and pumps because the water table is so high. One thing we learned when we moved here was that it is pretty cheap to put in a septic system here unless you hit solid rock, but very expensive to put in a well. In WA those two expenses were reversed. Fortunately, we didn't have to put in a well because we have Tucson city water, so we saved that expense down here. You can see how well-drained, sandy and dry the dirt is in these pictures.

But there are no sewers where we're building and it's so far out that we will never see any in our lifetime, so we will have a septic system and this is what it looks like.

This tank is 1200 gallons and has 2 lines out from it.


This is a close up of some of the apparatus.


This is a close up of one of the lines. The pipe sticking up is one of the clean outs. Perhaps the new ones in WA are this way, too, but down here they put a clean out close to the house before you get to the tank and then some at the end of the drain field. Along with the tank itself, that makes for 3 clean out options if you ever need them.


Gas Trench

Other digging that was done was for the gas line from the street to the house.


Cabinets

Last time I promised an update on the laundry cabinets and this is it. This is Kelly and Trout working on the doors for them. Kelly found some very cool hinge hardware that automagically closes the doors without allowing them to slam when they reach a certain point in the closing arc.

And don't worry about Trout pressing down on the door on top of the drawer here. Those drawer glides are very strong.


Master Bath

Tiling moved right along on the master shower. The wall goes up to 8 feet and then stops just like we wanted it to. The tiling goes almost to the top. All the lizards are in.

And the top rows of trim tile are almost complete. The tiles in this pattern are the primary decorative tiles in Trout's and my vanities. The gold is his and the blue is mine.
This is how the corners look. Dave and Tim did a great job of going around the corner and continuing the tile pattern. This is the way these tiles are intended to be laid. They won't be laid like this on our vanities.

This is a cut-off corner we will face as we shower. It was planned so that two 4" square tiles would fit across it.


This is the master tub almost finished. We decided to put a lighter color terra cotta accent wall behind it and the toilet. I will also used that color on the back wall of my vanity.

It's the darker of these two paint samples. This is one shade lighter than the accent wall behind the rangehood in the kitchen.


Our Sinks

Several posts ago I mentioned that we bought our vanity sinks but that I didn't have pictures of them. Now they are in the house and I do.

Trout's is the same pattern as his primary vanity tile. In fact he picked the sink before he picked the tile.


When we went to do the final selection, there wasn't one like my primary decorative tile. I debated whether to get a blue and white sink that would be plainer or to get one with a wilder pattern. Both Trout and Vicki (our builder) encouraged me to get the wilder one, so here it is.


This is the vanity tile that this sink will set into.


Guest Bath

The tiling was almost completed in the guest bath. This is the edge by the side of the vanity.


I don't have a picture of the sink for this bath yet, but the rim is the terra cotta you see here, there's a terra cotta peacock feather trim like this and the basin has a white background with green prickly pear painted on it.

This is the tub and the mural at the back of it.


Exterior Colors

We had to make final decisions on our exterior colors so Dave could order the paint. We pretty much stuck with what we'd already picked. All along we intended to let our neighbor to the north choose the color for the north wall of the shop since it faces them and we will rarely see it. She chose the same color as the rest of the shop -- Pomegranate.

I put some of these pictures in a post before, but this is basically what we will end up with.
The east side of the Pomegranate shop.


From the southeast side of the Lapis house.


From the southwest side showing the Spanish Olive fireplace and dining bay.


Spanish Olive courtyard stairs and Pomegranate shop.