Smooth Stucco Completed
The first of the big three is the completion of the stucco on the exterior of the house. That means that it will soon be ready to paint. The surface is not quite as smooth as a baby's butt, but it's just what we wanted. Yeah, yeah, yeah, we know it will be more likely to show cracks. When we envisioned a place in Tucson so many years ago now, one of the ideas was to create a new place that looked old. So cracks are a blessing instead of a curse for us so long as they don't affect the structural integrity of the house.
Here are some pictures of the smooth stuccoed exterior. The most common wood frame stucco surface down here is one that is blown on rather than troweled on. It's very rough. The stuccoed-over adobe walls are often very smooth, but somewhat uneven. That's the look we wanted and this is very close to that. We can hardly wait until it's painted with the colors shown in the last post, and it will be better yet as those colors fade.
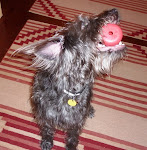
This is Trout walking on the south side of the house. You can get a hint of the smoothness here as well as the slight imperfections that make the wall a little lumpy looking.

This is a close up of that same wall a little farther to the west.
Here's a porch post base.
This is a view of the roof parapets. You may remember that these will be capped with adobes for the territorial look we want.
And this is the stairway down from the shop deck. That handrail is just primed. It will probably be silver. The wall on the right of the stairs will be capped with adobes by the builder. Trout plans to tile the tops and fronts of the stairs.
Interior Painted and Floor Stained
The other two big changes have to be taken together since it's almost impossible to separate them from each other visually.
The entire interior of the building was painted that Baby Chick color. One wall in the kitchen was painted the Georgia Clay and the insides of the bancos were painted Dive In. The fireplace won't be painted until the stucco on it has cured.
You will see from these pictures that the yellow varies greatly depending on camera angle, amount of light in the room, etc. It does that in person, too. I know our builder is a little concerned about the seeming brightness of the color, but all you HGTV watchers and anyone who has painted a room anything but white knows that it all changes when you put your stuff in there.
So let's start with the shop and garage. Here we have a smooth stucco exterior and the Baby Chick walls showing.

This is one of the shop. We expected them to leave the metal columns gray, but...

We did have them stain the entry to the shop office like the house floor along with the office bath. The porches will also be stained like this. This is on the exterior of the shop but under the stairwell.

Now for the house...
The floor finish is a multi-step process. We caught it through peek holes in cuts in the plastic covering over the windows. You can see how dull the finish looks here compared to later when the sealer was applied. You can also see how they protect the walls while they're working.
This is the entry as seen from the hole in the plastic over the sliding glass door across the great room.

This is the entry from outside of the front door.
 This is the guest room peeking around the edge of one of the open awning windows.
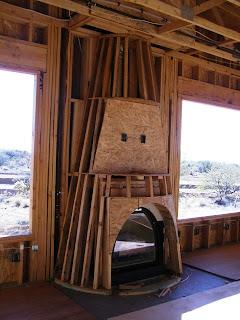
 And this is the fireplace with the bancos covered in the front.
In these photos, the floor has been sealed and the protective plastic has been removed. The floor is shiny, very shiny.
This is looking into the guest bath from the entry.

It may be reflection, but the color of the walls when you're in there looks exactly the same as that of the tub.
 This is a corner in the master bedroom. You may remember that we will not have any baseboards. The painters will have to come back and do the touch up painting along the bottom of the wall where it meets the floor. They may also be adding some accent walls if I can get them to do it without charging extra.
 This is another shot of the master bedroom with the colors looking somewhat different.
 In many of these pictures, the floor just looks brown, so here's a shot of what it actually looks like close up, like at the bottom of your feet.
 This is looking from the office across the entry into the guest bath. You can see the variety of colors of the same Baby Chick produced by the different lighting. You can also see how the door works with the floor.
 This is the kitchen from the great room. That's my camera bag hanging on one of the supports for the bar.
This shows the dining nook and part of the kitchen from the great room.
Here's the fireplace. Maybe the interiors of the bancos will look more blue when the fireplace is painted. They look very blue in person, but not in these pictures.

Other Progress
Other progress during this three-week period included the beginning of work on the tin patterns for the master bath cabinets. As before, it's my initial design with Trout's improvements and actual execution. This will be used only on the narrow drawers, but related designs to be seen next time will go on the wider ones and the linen closet doors. We call this design Ocotillo and Mountain.

Dave also got a lot of work done on the master shower. He got the drain set up completed.
And he got the bench built.
After the painting was done, the plastic was removed from the inside of most of the windows so that they could be opened a bit to allow circulation to dry the paint and to cure the floor. This is a pretty good side view of the north windows in the master bedroom. I include it because we love these windows and we haven't seen them uncovered in awhile.

So now we wait. Although we were able to get in to take the pictures and to shut the windows and sliding glass door, the floor really isn't quite ready for people to walk on it much yet. It should be totally cured by about June 4th.
Trout kept his boots on and I wore hospital sox inside. He tracked dust all over the floor, but nothing stuck in the finish. I followed along in my sox and wiped up the dust as we left. When I checked the bottom of the sox, there was hardly any color on them, so I guess the floor is already pretty well set.
 This is a close up of the layers on the north wall of the shop.
 Here's the foam and chicken wire that will hold the stucco.
 It has to go on the parapets of the roof because those will be stuccoed, too.
  This is a post base being prepared for the concrete to be poured below and the stucco that will cover it.
  And here you can see how the post bases look after the preparation, along with a lot of the rest of the house.
 During this time period, most of the mistakes got fixed. The stairs to the shop deck were reworked to have the right size risers and all the interior adjustments that I can remember were made. Most noticeable were the relocation of the plumbing and wiring for the guest bath vanity...
 ...and the lowering of the kitchen bar.


 Here's Trout trying to figure out where to put the volume control in the master bedroom. When you wonder why some things are located in seemingly odd places in a house, it may be due to necessity. Trout learned that sound quality can be compromised if the speaker wire parallels electrical wire within 18" of it. Speaker wire can cross electrical wire but not parallel it. So locations like this get dicey. We finally decided to put the volume control box on the side wall close to the window.


 Remember how we struggled over the height of the bar in the kitchen and decided on 45"? Well the framing wasn't changed on that when the plumber came, so the pipes are too high and will have to be adjusted after the height is lowered.


