 Here's a shot from the south east edge of the place.

Trout continued to work on the doors and drawer fronts for our cabinets. These are some shots during the process. He didn't pose for me. I just kept clicking while he worked.
Here he is punching away on what we called the Moon panel. It's for one of the wide drawers below the cooktop.


Then he pounds it in a different way with the rubber mallet and mat above it. That helps to even out the punching and keep the piece from curling up or cupping. He was going so fast here, I never did get a shot where you can see the mallet as anything but a blur. You can see it in the picture above lying on the table.

After checking again, he's back to punching. Now all you kids out there, please notice that he is wearing ear protection, safety glasses (new prescription ones this spring) and a glove on his left hand so it won't hurt so badly if he hits it instead of the punch and to help isolate that hand from the vibration when he whacks the punch.
 And this is the result for that piece. You can see some of the other work stacked around it.
While Trout was in Kelly's shop punching tin, Kelly was in his former house assembling the cabinets.
Instead of the "normal" drawer glides you see in most places, they decided to use some heavier duty ones. Not only were they cheaper, they were also stronger and silver in color.
I wanted the drawers to be full-extension. These are that and then some.
And they decided to use these adjustable feet. We had those for the cabinets in WA. They make the process of leveling much easier, saving on labor. They are less harmful to the floor in case you ever want to change the cabinets and they are comparable in price to building the normal plywood platforms.
We ended the week by selecting the basic colors for the interior of the house. Those should be painted this coming week. We will have some additional accent colors, but I may paint those myself later. I did want to have the painters paint the accent colors in the great room that go behind the TV on the fireplace and the range hood above the cooktop. I figured those would be super-hard to go back and paint myself.
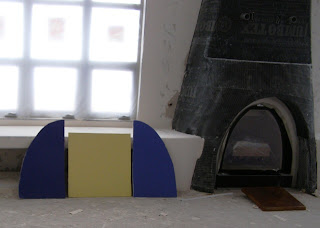
So we will have the darker color on the left in this picture for the fireplace and the inside of the bancos. It's called Dive In. Trout wanted the lighter blue, but Holly, Lani and I all agreed that the darker one would be better. It matches the cobalt tile and has a purplish cast. My feng shui book says we should have some purple in this room.
 The yellow is the color called Baby Chick that will be the base color throughout the house. Yes, it will be the color in the shop and garage, too. It's actually not as green as it looks in this picture. It's really 4th up the line in color from one that is exactly the same as the lighter yellow in the tile we'll be using for field tile in the kitchen. In case you forgot what that is, here it is again except the yellow tile will be laid diagonally.
After considering several options, we decided to paint the wall behind the range hood and above the tile pattern a terra cotta color called Georgia Clay. It's the darkest one on the left. Lest you be concerned about all these dark colors, the great room was very bright when I took these pictures, even with all the windows and door obscured with visqueen inside and out. The lighter colors tended to really fade out.

One other thing we did this week was verify the color for the floor. Here that is on a piece of concrete. You can never be sure it will turn out exactly like the sample, but it will be very close.

We contracted separately with the company to have them stain the shop bath floor and the shop pedestrian entry like the rest of the house. We also set up for them to seal the entire shop and garage floor with a clear sealer that isn't slippery and will help keep fluids from seeping into the concrete.
So that was week number 44 of La Mansión Maybe Mañana's gestation period. She's not an elephant, but she's getting close.


1 comment:
Fantastic...I really like the dark colors which will be very effective in all the bright Arizona sun. How did you decide on the punch work....that is looking really great and very original. I cannot wait to see it assembled. Tamara
Post a Comment