Monday, October 22, 2007
The Big Pour -- Part 3 of 3 -- Weeks 14 - 16
This is the 3rd of a series & I can't figure out how to reverse the order so it's your choice whether you read these postings from the bottom up or the top down. Just look to the right to see the other two for today. I'm going to try to get all the concrete pictures in here & there are a lot of them, so I hope things don't mess up on me again before I finish.
Okay so the forms were ready to go on Monday, the 15th. Why did they wait to pour the foundation until Friday, the 19th? Well, first there had to be a post-tension inspection. Dave had to give a piece of paper from that guy to the Pima County inspector to give us permission to pour. Everybody signed off and we were good to go.
But wait, there was one more little thing. Down here the dirt under the foundation must be termite treated before the slab is poured ... & the concrete has to be poured within 24 hours of the termite control chemical being put down.
So the concrete guys got there bright & early on Friday morning & I assume that the termite guys came the night before as they usually do. These pictures are from Friday during the pour & Saturday after it.
What happens in a big pour like this? I keep calling it that because it was like pouring concrete for 2 houses instead of just one, so it took a long time.
First the trucks line up on the road. Dave said we had 17 trucks for our project.
Then the trucks back into the site.
They load the concrete into the pumper truck.
And the pumper truck pumps it into the foundation. This is what I first saw when I arrived at the site on Friday morning.
Yes, that's a very impressive pumper. Here's another shot of it.
This is the concrete company. Sierra Vista is about 100 miles from the site. It's where Ft. Huachuca is located. But I was told they didn't come that far. The company has a concrete plant much closer.
This is the boss of the crew in the cowboy hat. It is Arizona, after all.
This is the crew pouring the concrete into Trout's shop. You can see the concrete coming out of the hose on the left.
The thickest concrete here is usually about 8 inches. This looks thicker than that to me, but Dave did say there would be places where it would reach 10 inches.
Here the crew is using boards to even out the concrete with the top of the forms.
The second smoothing is done by hand with a long-handled trowel.
Another troweling tool used for the house floor looks like a big fan.
This is what the troweling machine does to the surface.
The final troweling in the house to prepare the floor for staining is done by hand.
Here's what it looked like the next day. It's common for stained & polished floors here to have cuts in them. They are partly for design purposes & partly to stop the progress of any cracking. We have cuts in the shop & garage floors but not the house. We wanted the house floor to be consistently smooth there.
This was a very large crew. I counted at least 15 guys. Nobody did much standing around that I could see. I took some time to run to the closest store & buy cookies for everyone. They definitely deserved them. I understood they planned to grill their lunch before they left that day. I didn't stay late enough to see if they actually did.
These ones are fine-tuning the perimeter in the guest room/entry/office area.
As they were doing this, someone else cut expansion joints into the garage (& shop) floors.
The perimeter of the house & the wall between the garage & the shop needed to have bolts in the concrete for attaching the framing. This guy looks like he's in a rice paddy, but he's really setting the bolts.
And here some are the next day. The break in them is where the double doors are from the garage to the shop.
You may remember an earlier series of photos I did from left to right facing the house. Well here they are again. Each time I do them, I hope it will be easier to see the house develop.
This is the guest room with the guest bath & the great room beyond.
This is the entry with the great room beyond.
Here's the office with the kitchen beyond.
And here's the laundry with the master bedroom beyond.
This is the garage with the master bath beyond.
Here's more garage with the courtyard beyond.
Here's the shop work area with the shop bath and office beyond.
And finally, here's the shop parking area.
What are those funny strings? -- Part 2 of 3 -- Weeks 14 - 16
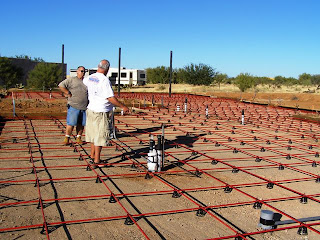
We hadn't been here very long when we took a little day trip down south to check out Sonoita, Patagonia, Nogales & Tubac as possible places to settle. We visited a development in Tubac with models & houses in a variety of stages of construction. Many of the foundations had these funny plastic cable things stretched across them. We had no idea what they were.
Now we know. They cover the cables that are structural support in a post-tension concrete foundation. Post-tension is used a lot down here because it does a better job of preventing cracking than rebar alone. The concrete is poured & the cables are stretched & tightened a couple of times as it sets over the following week.
We met the builder, Dave, at the site on Monday, the 15th (Week 16) & we got to see the interior structure of our foundation. Here are some pictures of post-tension in the raw.
This is a stack of cables inside their plastic sheaths, the little black forms that hold them up & I don't know what in the white bag.
Here are Trout & Dave discussing something in the kitchen.
This is a detail of the connection of the cables at the edges of the future slab.This is a detail of the business end of a post-tension cable. You can see there is some rebar involved as well as the cables. What you can't see is that the cables are very greasy so that they can slide inside the the red plastic tubes.
And it was so clear, I couldn't resist this picture of Kitt Peak with the white telescopes on top.
Late Due to Operator Error -- Part 1 of 3 -- Weeks 14 - 16
I thought I was so smart. I loaded all the photos I wanted to post into the posting on Sunday, got them in the right order & started to write the text around them. ...And nothing happened. ...And nothing happened. ...And I couldn't edit. ...And it was saving constantly & not letting me type. ...And I waited. ...And I logged off. ...And I tried again later. ...And I tried again tonight. ...And I finally gave up & I'm now starting over.
So I'm splitting this posting into 3 pieces in hopes that the the problem was too many pictures in one post, even though I could find nothing that talked about the problem online.
Week 14 (October 1 - 7) was very slow for us house-wise. Nothing much happened on the ground while Trout was gone, then we took off for Texas for Week 15 (October 8 - 14). We got back on the 14th & after lunch we headed straight for the building site. We got to see what happened while we were gone & we took a few pictures.
Trout hadn't seen the columns installed before. The only difference from the last picture of these is that they are locked in cement in this one.
One of the things we wanted to be sure of was the placement of the floor plugs in the great room floor and here they are.
I just had to pretend I was at the kitchen sink.
And Trout spent some time watering the salvaged barrel cacti. They can live a long time like this but I want to plant them as soon as we can.
So all we saw on that Sunday was the forms ready to have the cables strung & concrete poured. Still it was very exciting for Trout to see the columns that will hold up the roof on his shop.
Subscribe to:
Comments (Atom)


